この記事は Android スマホ用のアプリ開発の中で、
今後の開発で再使用性が高いと思われるコーディングをまとめたものです。
Java での開発経験、XML 構文規則、Android のアプリ開発経験がある方を対象としています。
Android のアプリ開発でお役にたててれば、嬉しいです。
(これから Android のアプリ開発や Java での開発を始めたい方への案内は、記事の最後で紹介します)
ExoPlayerのカスタムコントロールのアイコンを変更する
Exoplayerで音楽の再生をコントールする場合、PlayerControlViewを使用します。
PlayerControlViewには、音楽の再生や一時停止などを操作するための標準コントローラが用意されています。
今回は、標準コントローラのアイコンを変更する方法を紹介します。
ExpPlayer
ExoPlayerは動画・音楽ファイルのローカル再生のほか、動的適応型 HTTP ストリーミング(DASH)、SmoothStreaming、共通暗号化など、MediaPlayerではサポートされていない機能をサポートしています。
動画を再生表示するビュー画面、動画や音楽の再生や一時停止などを操作するためのコントローラなどカスタマイズ可能なコンポーネントをもつライブラリです。
ExoPlayerで動画や音楽を再生する方法はこちらで紹介しています↓↓↓
PlayerControlView
音楽の再生をコントールする場合、PlayerControlViewを使用します。
PlayerControlViewには音楽の再生や一時停止などを操作するためのコントローラが標準で実装されているため、ExoPlayerをアタッチするだけで、基本的な操作ができるようになります。
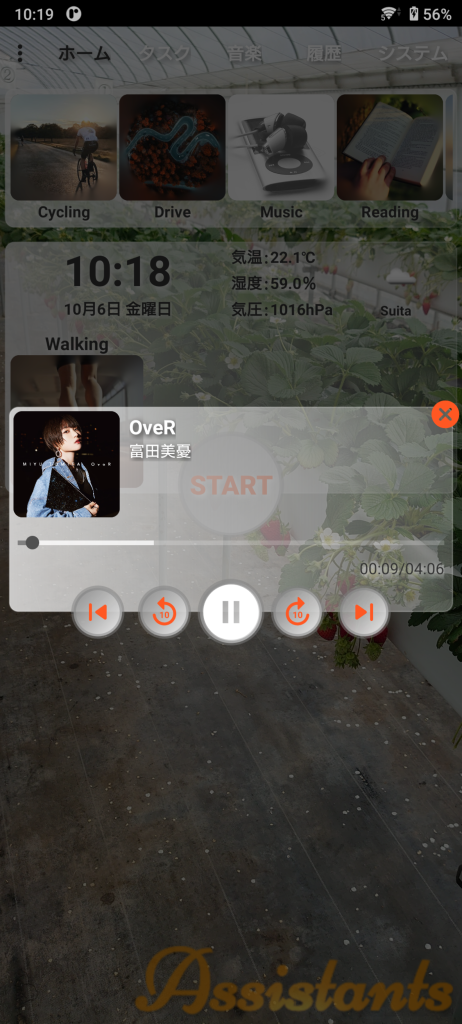
カスタムしたコントローラの構成は、先頭に戻る(前曲)、10秒戻る、再生(一時停止)、10秒進む、次曲を操作できるボタン、動画の再生位置の操作できるスライダー、再生位置(秒)と再生時間(秒)のテキスト表示です。
◎カスタムコントローラ(dialog_controller.xml)
<RelativeLayout
    xmlns:android="http://schemas.android.com/apk/res/android"
    xmlns:tools="http://schemas.android.com/tools"
    xmlns:app="http://schemas.android.com/apk/res-auto"
    android:layout_width="match_parent"
    android:layout_height="wrap_content">
    <LinearLayout
        android:id="@+id/main"
        android:layout_width="match_parent"
        android:layout_height="wrap_content"
        android:layout_alignParentTop="true"
        android:layout_margin="8dp"
        android:gravity="center_horizontal"
        android:orientation="vertical"
        tools:ignore="UselessParent">
        <androidx.media3.ui.DefaultTimeBar
            android:id="@+id/exo_progress"
            android:layout_width="match_parent"
            android:layout_height="wrap_content"
            app:played_color="@color/white"
            app:scrubber_color="@color/white"/>
        <LinearLayout
            android:layout_width="wrap_content"
            android:layout_height="wrap_content"
            android:layout_gravity="end"
            android:layout_marginEnd="8dp"
            android:orientation="horizontal">
            <TextView
                android:id="@+id/exo_position"
                android:layout_width="wrap_content"
                android:layout_height="wrap_content"/>
            <TextView
                android:layout_width="wrap_content"
                android:layout_height="wrap_content"/>
            <TextView
                android:id="@+id/exo_duration"
                android:layout_width="wrap_content"
                android:layout_height="wrap_content"/>
        </LinearLayout>
        <LinearLayout
        android:layout_width="wrap_content"
        android:layout_height="wrap_content"
        android:orientation="horizontal">
            <RelativeLayout
                android:layout_width="48dp"
                android:layout_height="48dp"
                android:layout_margin="6dp">
                <ImageView
                    android:id="@+id/exo_prev"
                    android:layout_width="32dp"
                    android:layout_height="32dp"
                    android:layout_centerInParent="true"
                    android:src="@drawable/ic_round_rwd"
                    tools:ignore="ContentDescription" />
            </RelativeLayout>
            <RelativeLayout
                android:layout_width="48dp"
                android:layout_height="48dp"
                android:layout_margin="6dp">
                <ImageView
                    android:id="@+id/exo_rew"
                    android:layout_width="32dp"
                    android:layout_height="32dp"
                    android:layout_centerInParent="true"
                    tools:ignore="ContentDescription" />
            </RelativeLayout>
            <ImageView
                android:id="@+id/exo_play_pause"
                android:layout_width="60dp"
                android:layout_height="60dp"
                tools:ignore="ContentDescription" />
            <RelativeLayout
                android:layout_width="48dp"
                android:layout_height="48dp"
                android:layout_margin="6dp">
                <ImageView
                    android:id="@+id/exo_ffwd"
                    android:layout_width="32dp"
                    android:layout_height="32dp"
                    android:layout_centerInParent="true"/>
            </RelativeLayout>
            <RelativeLayout
                android:layout_width="48dp"
                android:layout_height="48dp"
                android:layout_margin="6dp">
                <ImageView
                    android:id="@+id/exo_next"
                    android:layout_width="32dp"
                    android:layout_height="32dp"
                    android:layout_centerInParent="true"
                    tools:ignore="ContentDescription" />
            </RelativeLayout>
        </LinearLayout>
    </LinearLayout>
</RelativeLayout>
レイアウトに配置した View とコントローラのマッピングは、idで行っています。
コントローラには機能に応じて、idが決まっています。
コントローラにマッピングできるidは、こちらで確認できます。
PlayerControlViewのアイコン変更
標準で用意されているコントローラのアイコンを変更する場合、コントローラにマッピングされているidに対応するdrawableをオーバライドします。
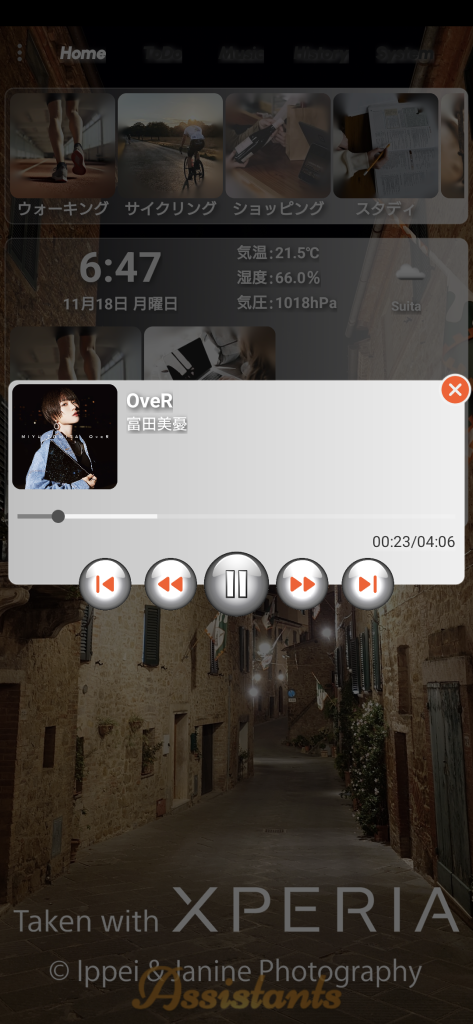
◎カスタムコントローラ(dialog_controller.xml)
<RelativeLayout
    xmlns:android="http://schemas.android.com/apk/res/android"
    xmlns:tools="http://schemas.android.com/tools"
    android:layout_width="match_parent"
    android:layout_height="wrap_content"
    xmlns:app="http://schemas.android.com/apk/res-auto">
    <LinearLayout
        android:id="@+id/main"
        android:layout_width="match_parent"
        android:layout_height="wrap_content"
        android:layout_alignParentTop="true"
        android:layout_margin="8dp"
        android:gravity="center_horizontal"
        android:orientation="vertical"
        tools:ignore="UselessParent">
        <androidx.media3.ui.DefaultTimeBar
            android:id="@+id/exo_progress"
            android:layout_width="match_parent"
            android:layout_height="wrap_content"
            app:played_color="@color/grey600"
            app:scrubber_color="@color/grey700"/>
        <LinearLayout
            android:layout_width="wrap_content"
            android:layout_height="wrap_content"
            android:layout_gravity="end"
            android:layout_marginEnd="8dp"
            android:orientation="horizontal">
            <TextView
                android:id="@+id/exo_position"
                android:layout_width="wrap_content"
                android:layout_height="wrap_content"
                android:textSize="14sp"
                style="@style/TextViewStyle1"/>
            <TextView
                style="@style/TextViewStyle1"
                android:layout_width="wrap_content"
                android:layout_height="wrap_content"
                android:text="@string/slash"
                android:textSize="14sp"
                tools:ignore="TextContrastCheck" />
            <TextView
                android:id="@+id/exo_duration"
                android:layout_width="wrap_content"
                android:layout_height="wrap_content"
                android:textSize="14sp"
                style="@style/TextViewStyle1"/>
        </LinearLayout>
        <LinearLayout
        android:layout_width="wrap_content"
        android:layout_height="wrap_content"
        android:orientation="horizontal">
            <RelativeLayout
                android:id="@+id/prev"
                android:layout_width="48dp"
                android:layout_height="48dp"
                android:layout_margin="6dp"
                android:background="@drawable/ic_base">
                <ImageView
                    android:id="@+id/exo_prev"
                    android:layout_width="32dp"
                    android:layout_height="32dp"
                    android:layout_centerInParent="true"
                    tools:ignore="ContentDescription,ImageContrastCheck" />
            </RelativeLayout>
            <RelativeLayout
                android:layout_width="48dp"
                android:layout_height="48dp"
                android:layout_margin="6dp"
                android:background="@drawable/ic_base">
                <ImageView
                    android:id="@+id/exo_rew"
                    android:layout_width="32dp"
                    android:layout_height="32dp"
                    android:layout_centerInParent="true"
                    tools:ignore="ContentDescription,ImageContrastCheck" />
            </RelativeLayout>
            <ImageView
                android:id="@+id/exo_play_pause"
                android:layout_width="60dp"
                android:layout_height="60dp"
                tools:ignore="ContentDescription" />
            <RelativeLayout
                android:layout_width="48dp"
                android:layout_height="48dp"
                android:layout_margin="6dp"
                android:background="@drawable/ic_base">
                <ImageView
                    android:id="@+id/exo_ffwd"
                    android:layout_width="32dp"
                    android:layout_height="32dp"
                    android:layout_centerInParent="true"
                    tools:ignore="ContentDescription,ImageContrastCheck" />
            </RelativeLayout>
            <RelativeLayout
                android:id="@+id/next"
                android:layout_width="48dp"
                android:layout_height="48dp"
                android:layout_margin="6dp"
                android:background="@drawable/ic_base">
                <ImageView
                    android:id="@+id/exo_next"
                    android:layout_width="32dp"
                    android:layout_height="32dp"
                    android:layout_centerInParent="true"
                    tools:ignore="ContentDescription,ImageContrastCheck" />
            </RelativeLayout>
        </LinearLayout>
    </LinearLayout>
</RelativeLayout>
先頭に戻る(前曲)、10秒戻る、10秒進む、次曲を操作できるボタンは背景にPNGファイルのベースにベクターを配置、再生(一時停止)ボタンはPNGファイルをそれぞれ用意します。
コントローラにマッピングされているidに対応するdrawableのオーバライドは、drawables.xmlで定義します。
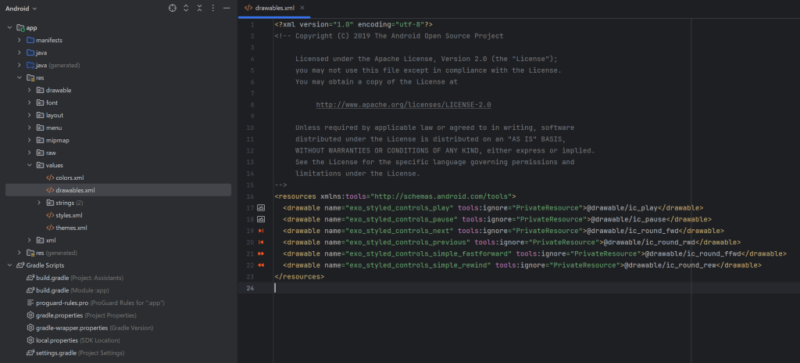
◎drawables.xml
<resources xmlns:tools="http://schemas.android.com/tools">
  <drawable name="exo_styled_controls_play" tools:ignore="PrivateResource">@drawable/ic_play</drawable>
  <drawable name="exo_styled_controls_pause" tools:ignore="PrivateResource">@drawable/ic_pause</drawable>
  <drawable name="exo_styled_controls_next" tools:ignore="PrivateResource">@drawable/ic_round_fwd</drawable>
  <drawable name="exo_styled_controls_previous" tools:ignore="PrivateResource">@drawable/ic_round_rwd</drawable>
  <drawable name="exo_styled_controls_simple_fastforward" tools:ignore="PrivateResource">@drawable/ic_round_ffwd</drawable>
  <drawable name="exo_styled_controls_simple_rewind" tools:ignore="PrivateResource">@drawable/ic_round_rew</drawable>
</resources>drawablesでオーバライドできるdrawableは、こちらで確認できます。
カスタムコントロールのアイコンを変更している Androidアプリです。
今回は、ここまでです。
誤字脱字、意味不明でわかりづらい、
もっと詳しく知りたいなどのご意見は、
このページの最後にあるコメントか、
こちらから、お願いいたします♪
ポチッとして頂けると、
次のコンテンツを作成する励みになります♪
これからAndroidのアプリ開発やJavaでの開発を始めたい方へ
アプリケーション開発経験がない方や、アプリケーション開発経験がある方でも、JavaやC#などのオブジェクト指向言語が初めての方は、Androidのアプリ開発ができるようになるには、かなりの時間がかかります。
オンラインスクールでの習得を、強くおススメします。
未経験者からプログラマーを目指すのに最適です。まずは無料カウンセリングから♪

ゲーム系に強いスクール、UnityやUnrealEngineを習得するのに最適です。まずは無料オンライン相談から♪

参考になったら、💛をポッチとしてね♪





コメント欄